Useful pages

28 February 2016

A little red dress, Butterick 5917

I joined... Little Red Dress Contest ...the Little Red Dress Contest at Pattern Review!

Nothing like a PR contest to get me going. Butterick 5917 had been on my short list for a while but I was worried about how the ruffles would behave. For me ruffles are a source of fascination but also fear because I definitely don't want to look like a piñata. Who does! I once made a Burda ruffled dress that I couldn't bring myself to wear for that very reason. Thankfully, I was reassured by looking at all the very nice versions of Butterick 5917 at Pattern Review, especially LlanoGirl's version in blue linen.

So, motivated by the contest, I took the plunge and I am very glad I did.

I made it in a wool that has a clear stripey structure, and also a boucle surface. The fabric is almost too thick for the ruffles, but I managed to trim and grade all the seams enough that the ruffle seam doesn't look too bulky. I was careful when ironing not to mark the seam allowances on the front panels. It is also not uncomfortable on the inside, in fact I didn't feel it at all when I wore it to work on Friday. Mmmmhh... now looking at the close up photo maybe I need to use a couple of prick stitches to hold those ruffles a bit closer to the middle panel at the bottom. Or perhaps it is just the angle of the photo...

I did make a couple of modifications: my usual sway back adjustment at the horizontal seam at back. I also would have converted the back slit into a kick pleat since I prefer the latter because they hang better, but I forgot (happens often around here...). I also shortened the bodice (front an back) by 2.0cm. I did this under the armhole, so as to not change its shape. I did this to bring the horizontal seam closer to the underbust line. I find that this is most flattering on me. After a day of wearing it I think I could have raised this seam by another 1-2cm further (note to self for the next version). Having raised this seam I then added 3.0cm to the skirt length (so I lengthened the skirt by only 1.0cm).

The short sleeves (version A) are supposed to be lined in self fabric. But my fabric is a bit itchy because of the wool and boucle structure, so I lined them with lining fabric instead. I really liked how these sleeves were drafted with a soft curve over the arm and not too much fabric at the under arm. And I also liked how nicely finished the hem is without having to hem them by hand.

The entire dress is lined, but I didn't have enough of one fabric so I took a page out of my friend Beth's sewing book and mixed lining remnants. A red silky polyester was the best color match so I used it for the sleeves and fronts in case a bit of the lining ever shows. A stripy red rayon with a bit of elasthan became the lining of the skirt for maximum comfort. Unfortunately by this point the bright reds were gone so I had to use a burgundy georgette to line one of the bodice back pieces. Not too pretty but I'm feeling virtuous for being so thrifty!

This Friday I wore the dress to work, but because it is rather cold (by our standards, 2-5C) I wore a turtleneck underneath as well as tights and boots. I wanted to wear a cardigan or jacket also, but I realized my only chocolate-brown jacket (RTW) has a mandarin collar which does not go well with the ruffles of this dress. So, I guess I will need to make a matching jacket for it one of these days.

My review of Butterick 5917 is here at Pattern Review.

20 February 2016

An (almost) ideal raincoat for cycling in the Netherlands

I live in the Netherlands and everyone knows this is a country of tulips, cycling and... lots of rain. The last two in particular are an unfortunate combination. My daily commute involves cycling 20min from home to the train station. The daily exercise keeps me healthy and I cycle through lovely scenery so I don't complain too loudly.

But this regimen does require special gear. My dresses always, but always, have a slit at the back to accommodate the bicycle seat. I wear a rain hat because I haven't yet mastered the art of cycling with one hand while gracefully holding an umbrella against gale winds with the other (many of them do! Especially teenage girls, and it is amazing to watch!). Me? I wear waterproof outer clothing. Notice that I didn't say "a raincoat". That's because the Dutch typically wear a plastified poncho/henley and matching plastified over-pants. Yeah...

When I wear pants to work I wear these too and they sure keep me dry. But now I wear skirts or dresses 99% of the time and bunching my skirt inside the plastic over-pants is neither pretty nor comfortable to say nothing of the wrinkles. I usually wear my beloved Michael Kors raincoat, but it is sorely lacking a few improvements. So I have longed for "The Perfect Raincoat". One that is long enough to cover beyond my knees when I bike. That magically stays closed despite the wind. And that has sleeves that are long enough to still cover my wrists while my arms are outstretched to reach the handlebars.

Meet "The Perfect Raincoat, v. 1.0".

The pattern is Sewaholic's Robson coat, so beloved throughout the sewing blogosphere. I have been wearing it regularly since last November and it does its job very well thanks to the few simple adjustments I made to turn it into the perfect biking-in-the-rain gear.

I lengthened the sleeves by a good 4.0 cm so that my wrists will stay dry (and warm) even with outstretched arms. This makes the sleeves too long when I'm not on the bike but that's ok. I just fold the hem to the inside when I'm not on the bike. That's why I left the tab placement at the original point on the sleeve. It looks weird when the sleeve is at its full length but that is only when I am biking and hopefully I go by fast enough that nobody really notices.

To keep my knees fully covered when I am biking requires two different things. First, I lengthened the coat to bring the hem about 5cm below the bottom of my knees. The Robson is already pretty long, so I only added 4 cm more. To lengthen it I simply continued the seam lines in the same shape, meaning that the A-line shape continues to a larger hem circumference (mine is 185cm). I thought about redrawing the seam shapes to keep the original circumference at the new hem, but more room is better when cycling.

The second adjustment is a very little addition. So little in fact that my camera refuses to focus, so I cannot show you pictures. It is just a simple hook on the right side of the coat at the hem. This hook grabs a small thread tab sewn along the seam of the left side of the coat. This simple little addition is all it takes to keep the bottoms of the coat from flapping in the wind allowing rain to sneak in.

On the inside the coat is underlined throughout with a B&W Vlisco cotton. The outer fabric is coated on the back with some rubber-ish layer that is very sticky. When I iron the cotton over this rubberish layer (with a very cool iron!) the two layers stick together almost as if they were fused. Although this is not permanent it still helps the pieces keep a nice shape together. Instead of finishing the seam edges with bias binding as per the instructions, I just cut the cotton pieces 3/4" wider on the vertical seams and encased the edges of the outer fabric with that. This treatment looks nearly the same as bias bound edges but it saved me the effort to make bias tape. Still it was a tedious process because each seam edge required two passes with the machine and there are lots of seams on this princess coat! I then ironed all the seams open and skipped the topstitching which would have made additional holes in my waterproof fabric. (I did topstitch on the edges of the fronts, flaps, tabs, hems and collar, since I figured those places have another layer of waterproof fabric underneath.) Under very heavy rain water does come in through the seams, so it would have been even better to cover them in some waterproof polymer. Note to self for v. 2.0.

In addition to giving the thin outer fabric some nice body, another advantage of this cotton underlining is that it helps the coat "breath" a little, which is very welcome while biking, especially if I am running late and need to "step on it". As a final bonus the cotton is definitely not slippery so it keeps the coat fronts from sliding too easily from my legs as I bike.

The one disadvantage of the cotton underlining is precisely that because it is not slippery it is a bit difficult to remove the sleeves when taking off the coat. Especially if I wear a fuzzy sweater underneath I end up flipping the sleeves out just trying to take off the coat.

I am very happy with my Robson trench coat. It is a practical garment that does everything I wanted from it without sacrificing style. All in all however, for my next raincoat I won't be using this pattern for two main reasons: first, the princess seams to the armhole at the front of the coat create some tight curves that require serious easing. As you can see from all that puckering, my ability to ease laminated fabric leaves much to be desired. Even if I get better at it, the fabrics used for waterproof raincoats will never ease as nicely as a wool. I think it is better if I just find a raincoat pattern with princess seams to the shoulder.

Also, the Robson pattern has a single piece collar. This causes the collar to fold unattractively. I think that a two-piece collar with an undercollar would solve this problem, so I will look for that in my next raincoat pattern.

Finally, I leave you with a picture of the buttons. It doesn't always happen that I find the perfect matching buttons already in my stash! Unfortunately I only had 8 of them, so I had to skip the buttons on the shoulder tabs and at the back flap. In fact I also used different buttons under the front flaps, since nobody sees those even when the coat is closed. Hoooray for making it work with what you have!

My review of the Robson coat is here at Pattern Review.

13 February 2016

I made a snake print coat, can you believe it?

Let me start you with a photo of said coat before I offer my apologies for being away for over a year (gulp!).

Okay, here I go... Life has been difficult this past year. Sewing has been a refuge, so there's been plenty of sewing going on, but blogging has always been difficult for me. In trying to give myself the room to be able to cope with the challenges in my life, I didn't want to push myself to blog. Then, this week, dear, sweet Ruth from Core Couture left a comment on my last blog post and it made me so happy to hear from her. And this made me realize one thing I had forgotten: that being part of a community is also a great source of strength and support. And so here I am.

It would have been even better if I had finished the coat in time to join Anne's fabulous annual Jungle January event, but tiny steps, peeps, tiny steps...

So, about the coat... the fabric is a lovely and warm plush beige on the inside, laminated with "scales" in a wonderful imitation of snakeskin. As you can see in the photo below, the fabric is relatively thick and full of body, so I needed a pattern with few seams and minimal darts.

Enter Vogue 2590 by Claude Montana. He is one of my favorite designers from the 90's and I especially love his coats because they can be quite dramatic and somehow still timeless.

This particular pattern has minimal shaping so it seemed the perfect pairing for the fabric.

The only modification I made to the pattern was to narrow the bottom half of the sleeves. The technical drawing seems to imply that the sleeves are simply straight. The model in the red coat on the envelope front has her arms folded such that it is easy to miss the fact that in fact the sleeves open up into somewhat of a bell shape. Luckily this was very obvious in the muslin and very easy to change. I just tapered the pattern from the elbow to the wrist by 3.0 cm on each seam (6.0cm all around). I was careful not to eliminate the extra ease on one side of the seam that gives the sleeve a nice curve to match the natural arm shape.

I also did some things differently than indicated in the instructions. All these changes were adaptations for the special fabric that I am using. The most obvious difference is that I used lapped seams. Both because I wanted to minimize the bulk and also to add a bit of visual interest to the coat. The fabric doesn't ravel, so I cut the edges of the fabric at an angle to expose the hairy underside and offer a nice contrast to the dark snakeskin print. I was also worried about bulk so I pondered a while about whether or not to keep the front facings. In the end I kept them and I tacked them to the pocket linings to force them to stay folded to the inside. I also eliminated the lining since that gorgeous plush side of the fabric had to remain exposed.

For the collar I made two major changes. The snakeskin print is a bit scratchy because of the plastified "scales" and I didn't want to have that against my skin. So the inside under collar is sewn with the plush (hence reverse) side of the fabric facing out. For the main collar piece I decided not to make it of double fabric. I thought two layers would be too stiff so it is just a single piece of fabric. Oh, and I just realized that I forgot to cut the seam allowance off at the bottom of the collar. So the collar you see is actually 5/8" longer than it should be. Hmmm... I'm not sure that I will cut that off, I kinda like this "tall" collar.

I also eliminated any hems at the sleeves and the coat bottom. I simply cut the edge carefully with my sharpest scissors and left the edge raw. I considered doing the same angled cut as on the seams to expose the contrast fur side, but I decided not to do this in the end. I worry that the edge will be too fragile, plus the contrast wouldn't always be visible since the hems are not always seen against a darker background.

You might have noticed that there are no buttons or snaps to close the coat. Well, the thing is... the coat doesn't close over my bum! The muslin was just right, but it was in a wool fabric which obviously has some give. This laminated fabric has zero give and it looks obviously strained if I try to hold it closed below the waist... So I'll just have to pretend that I am super chic like those fashionistas that are always getting photographed with their coats open...

The back has an inverted pleat to allow for movement. The fabric obviously doesn't make crisp folds, so I had to edgestitch the pleat folds to keep them nicely shaped. This will probably reduce the life of the coat since I expect that the plastic film of the "scales" will start peeling off at this sharp edge. But leaving the soft fold didn't look nice, so I chose to sacrifice longevity for looks.

One last thing I want to mention is the darts. The coat itself is only shaped via the seams, but the sleeves have darts at the shoulder. This dart is absolutely necessary to give enough fabric at the upper arm yet not have too much of this thick fabric to ease into the armhole. Can you imagine? It would be impossible to ease this thick, unforgiving fabric! Even with the dart I still have to ease a bit of the sleeve into the armhole and I was not always successful. There is some rippling going on on both sleeves. Infuriatingly the rippling happened on the front in one sleeve and at the back on the other. I think this happened because of the fur pile and the different sewing directions. The rippling seems to have happened on the side where I was sewing against the pile, which means the fabric was fighting the sewing machine. It now occurs to me that maybe I could have put some tissue paper between the fabric and the feed dogs to see if that helped. Oh well. Note to self for next time. Oh yeah, so back to the darts... overlapped seams and darts don't mix well. I thought about sewing the darts normally and cutting them open on the inside. But on the sample I made the fold that is created at a normal seam made the fabric lay funny at the sleeve cap. Plus there was an obvious difference compared to the two other seams at that point. So I went ahead with lapped-seam darts. I used the technique that I learned on my Donna Karan coat.

I leave you with a view of the inside of the coat. Don't you just want to run your hand up and down all that soft, hairy fabric? Hmmmmm...

My review of Vogue 2590 by Montana is here at Pattern Review.

31 January 2015

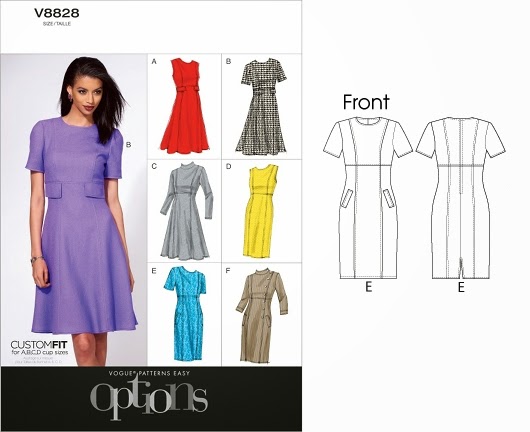
Vogue 8828 to copy a designer tweed dress

Hello, hello sewing friends!

I have been sooooo long away that I hardly know how to restart this blog. But what better way than by joining my absolute favorite contest of all: Pattern Review's Bargainista Fashionista!

This time around I made a copy of a Fendi Tweed Sleeveless Crewneck Dress worn by Kerry Washington a couple of years ago.

I used pattern Vogue 8828 view E, the straight skirt, but with a couple of major modifications.

The biggest change was lowering the waist seam to the natural waist. This was not particularly difficult, just required a bit of precision. I first drew the seamlines on the skirt and bodice pieces and matched them to each other in the corresponding pieces, then I traced a bodice that was 9cm lower and similarly a skirt that started 9cm lower, at the natural waistline.

The second modification was adding the inverted pleats in a contrasting fabric. These pleats are just made with a rectangle of fabric sewn at the princess seams all the way from the hem to the lower hip. I did three things to ensure that the pleats behave nicely. First, I understitched the seams with the tweed so that the white fabric naturally wants to fold under the tweed. Second I edgestitched the folds of the inverted pleats. This is not really visible from the outside except when I walk, but it makes sure that the white fabric keeps wanting to go back and stay folded keeping everything straight. Finally, on the inside of the dress I "hung" the top corners of the inverted pleat from the dress waistline, to ensure that the pleats don't droop and become visible under the tweed at the hem. All of this seems to have paid off since the dress hangs very nicely when I just stand straight.

I also added sleeves, which are included in pattern version E, so that was not a pattern alteration. More an adaptation I made to the original designer dress I was trying to copy. I want the dress to be office appropriate and sleeveless is not really okay in my work environment, only perhaps on very hot days in the summer, but then I wouldn't be wearing a wool dress!

A minor modification was that I lengthened the skirt by 4cm to reach my favorite skirt length, just below my knee.

I used a wool tweed from the Spanish distributor Cadena. The twill is lovely! It is loosely woven but so well behaved that it moulds easily to any shape you want, so setting in the sleeves was a walk in the park. The contrast fabric is a remnant in just the right shade of off-white. And when I say "just the right shade" boy let me tell you, it was hard to find a white fabric that went well with the tweed! After buying two remnants that I was sure would work but didn't I started carrying a swatch of the tweed around with me until I finally came across this rayon-blend broadcloth remnant. It has a wonderful drape, much lighter than the tweed obviously which works well in the inverted pleats. It was a bit translucent so I used it double and that works even better, not just for opacity but also by making it heavier to match the thicker tweed.

For the contrast trimming I used folded bias tape 12mm wide in matte black. I had never used this kind of tape. I've only used the satiny sort that is very shiny. But all that shine didn't go well with the texture of the tweed, so I opted for this matt one. And you know what? I bought 12 meters of it, and I never found a joint! The 12m was one enormously long continuous tape! How is that possible?! Anyway, I added the trim by hand, pick stitching and that took fooooooreeeeever! I wonder how the trim is attached in the Fendi dress, I can't imagine they also did it by hand...

Now for the cost calculation. I got this tweed form the remnant table at the Cadena shop in Madrid. It was €63 for the 2.2m piece. I used 1.4m for this dress so that comes to €40.09 for the wool tweed. The white rayon blend broadcloth from the pleats came from another remnant table, and it was only €4.00 for the 1.2m piece. I used 0.80m so that comes to €3.20. I lined everything in a grey poly lining from the stash. I can't remember how much that was anymore, but it is from before I knew about Bemberg linings, so that is over 20 years ago! I was a student then with no money so I would not have dared to pay more than US$5.00/yd back then. And I have like 10m which means it was probably a super deal. Anyway, I'll say it was $5.00/yd and I used 1.5yd so $7.50 for the lining. And since the Euro and the US Dollar are just about on par lately (sigh!) I will call it €7.50. I also used a hook and eye and an invisible zipper, but those we don't have to count so that only leaves the black trimming. That I bought 12m at €0.30/m so that comes to €3.60. So the grand total is: €54.39.

The page at Barneys where I pinned the inspiration dress from is amazingly still live: Fendi Tweed Sleeveless Crewneck Dress. However there is no price anywhere anymore and I cannot find any reference to its price anywhere else. So I looked up other, current Fendi tweed dresses. I didn't find anything truly similar to my inspiration but other current Fendi wool dresses seem to range between €1,000 and €3,000. So I'm going to pick the middle and say it is €2,000.

That means that the percentage I saved is 1-(54.39/2000) = 97.28%. Wow, now that makes me double happy with my dress!

My review and entry is here at Pattern Review.

06 April 2014

First SWAP pair: Vogue 8751 pants and Vogue 7903 blouse

So here is the first outfit that I completed as part of my Stitchers' Guild 2014 SWAP plan. It's a silk blouse and wide leg trousers in a woolen herringbone.

The blouse is Vogue 7903 by Sandra Betzina and the trousers are Vogue 8751.

I have made this blouse before in the short sleeved version so I don't have anything new to say about the pattern. This time, my fabric is silk georgette and I didn't want it too fitted so I didn't make all six waist darts at front, I only made two. The only other change I made was bringing the shoulder point up by ±1cm (no change to the sleeve itself). Funny how different the same pattern looks when it is made in a totally different fabric!

The trousers, I first saw them on the lovely Ruth of Core Couture. After seeing hers, I immediately went and ordered this pattern, foolishly forgetting that she is much taller and leggier than I am. Once I was ready to start sewing them, I luckily realized that I needed to make a muslin to see how they fit my body type. Us pears, we cannot just wear any kind of trouser...

And indeed, from the muslin I decided that the pant legs were too wide for me. I tried on my favorite trousers for comparison and the legs are narrower by 8cm at the hem!

So that's what I did, tapered each side of each pant leg by 2cm giving me 8cm less all around and I do like the proportions better on my body shape.

Now here is the funny thing about this pattern. I typically have to make a 1.5cm swayback adjustment, but not with this pattern. I'm not sure why not, but the back looked perfect just "out of the box". I'm guessing that the yoke pattern pieces are somehow responsible, but I am not sure how exactly.

Anyway, I don't often wear pants because I haven't found many that fit, but this one does so it is a welcome addition to my wardrobe! Oh and my review of Vogue 8751 is here at Pattern Review.

31 March 2014

My radiant orchid coat, Vogue 1321 by Donna Karan

My new coat has been done for a couple of weeks now, but it took me a long time to get all the photos done. And then another while to write this post. It's just that I am so proud of this one that I want to give you more details. I hope you won't mind the longer post and gazillion photos.

We begin with a first impression photo. Came out nice, no?

Please forgive the sunglasses, one of my superpowers is to always know precisely when to close my eyes just in time for the photo. After so many tries I just decided to give up and make use of camouflage. Mmmmmhh, that hem needs another good pressing...

Anyway, my fashion fabric is a wool knit that was felted in some way and then bonded to a much thinner and silkier knit at the back. Its thickness and the backing fabric give it a stiff drape. It falls in wide folds, standing away from the body. With the silky backing I can easily get in and out of the sleeves without needing a lining. It also means that I cannot use any fusible interfacing.

All of these qualities make this fabric perfect for Vogue 1321 by Donna Karan, a full-skirted coat with a dramatic collar.

Before cutting into my fabric I made a proper full body muslin. I didn't have any muslin fabric as thick and heavy as the actual fashion fabric, but the muslin could still tell me about the fit, even if not so much about the drape. And I am soooo glad that I did!

In the muslin I could see that the sleeves were too wide and there was too much fabric around the sleeve at the bodice and especially at the underarm. In fact you can see this also on the pattern photo, but because the model is so thin, she still looks stylish even with all that extra fabric around. Me? Probably not so much.

So I removed a total of 6cm from the sleeve, making it narrower all along its length. I divided the 6cm between the underarm piece and the front sleeve piece, 3cm each, parallel to the grainline.

Then I also raised the armhole by 6cm. I also redrew the armhole shapes to match both sides, on the bodice and the sleeve. This was not much change at all since the sleeves are not deeply set.

All the seams are lapped, including the darts on the bodice and on the collar. I had never sewn darts using lapped seams so I made some tests. Lucky for me since the dart point ended up with a gaping hole because the overlap becomes too small for the stitching to grab the underlayer. Nobody wants holes like that, and especially not on an attention grabbing collar! I first tried sewing a normal dart and then topstitching it, but it looked too raised compared to the lapped seams. So in the end I just didn't cut the dart all the way to the dart point as the instructions said to do. I stopped cutting ±5cm before the end point and voila, hole averted!

With all those lapped seams to mark and sew do you know what was my absolutely unmissable tool? A 5/8" gauge, homemade out of cardboard. Completely free and totally invaluable :-)

Except for my choice to narrow the sleeve, it is a rather easy coat to make. There is no interfacing, no shaping with heat and moisture, no lining and only two buttonholes (which you could omit if you decided not to make the sleeve tabs). It did take me forever to hide all those thread ends, but then the inside looks sooooo pretty and neat, doesn't it?

For the pockets I used some leftover silk charmeuse for a lovely feeling on my hands. I used an overlock thread chain to keep the pockets from flapping too far around.

OK. I've tortured you enough with all these details, so here are the three views of my coat. I'm really loving it. The color makes me happy, the collar is actually very nice against the wind and the wide skirt goes perfectly with all my full-skirted dresses.

I did have to rummage through my belt collection to find the longest possible belts since all that fabric requires quite a few more centimeters than usual. And this is not a coat you want to wear without a belt. Saying it looks shapeless doesn't fully describe the mess of fabric swinging all around.

I've submitted my review of Vogue 1321 by Donna Karan to Pattern Review.

BTW, tomorrow is the last day to sew for the Stitcher's Guild 2014 SWAP and this coat is only my second garment posted! Yup, I'm afraid I'm not going to make it... I've actually sewn 6 of the garments in my 2014 SWAP plan, but it is obviously not the full eleven. From the beginning I knew that SWAP was too ambitious for my skill level and speed, but you know what else I discovered? I got a bit bored. Bored of working with the same fabrics and color scheme, but also bored with knowing exactly what I was going to sew for the coming 3 months... I kept getting new ideas that I really wanted to get to, instead of these old ideas I had long time ago. So, I'm officially bowing out, though I will still try to post the rest of the garments I sewed for the SWAP. Here's a sneak preview. Thanks for reading!

08 March 2014

Another peplum, knit jacket Vogue 2989

I've kinda gone astray from my plans for the Stitcher's Guild SWAP 2014. I was in dire need of a warm jacket or sweater or anything that could help to keep me warm in our newly redecorated offices which for some reason have also become colder.

So, I rummaged through my stash looking for the thickest, warmest fabric that I could find and I turned it into this:

Does look warm, doesn't it? It is also super, super comfortable. The pattern is the jacket from Vogue 2989.

A simple jacket with lovely lines, raglan sleeves, a peplum and a sort of scarf collar. I totally love the pattern but the actual jacket came out kinda wide, don't you think? I made my usual size 14 and the waist fits fine. But the sleeves and the upper chest is where I think there's too much fabric. Actually, looking at the side view there is also too much fabric at the underarm. If I make it again I will try to bring the armhole a bit higher. Perhaps even also a small bust adjustment?

Even though it is a bit too wide I am still very happy with my new jacket. It was super easy to make and came together very quickly. Because my knit had a tendency to curl at the edges I topstitched all the seams, holding the seam allowances in place. The knit is very fluffy so the topstitching is relatively discreet, which I think is nice.

One change I made was to leave the collar drape bits "single ply". The pattern asks you to cut 4 pieces of the collar drape, two for each side, one at top and one at bottom. But I thought my thick knit would look too thick and more importantly, I didn't have enough fabric to cut all 4 pieces. In fact, I didn't even have enough to cut 2 collar pieces. I nearly panicked when I noticed this but then I realized that in a real knit like this I could "graft" two pieces of fabric just like I do with my hand knits. It worked beautifully, you can't even see where I grafted the fabric together (it's ~10cm below the shoulder seam. I told you it wasn't visible!).

It closes with a simple hook and eye at the waist.

Despite the extra fabric under the arms it is a warm and welcome addition to my wardrobe.

My review of Vogue 2989 is here at Pattern Review.